
 EN
EN
Why LED Headlight Replacement Requires More Care Than Halogen Swaps
An LED headlight replacement is not simply a matter of removing an old bulb and inserting a new one. The physical differences between halogen and LED bulbs — including larger base diameters, integrated driver modules, external heat sinks, and additional wiring for Canbus decoders — create multiple opportunities for damaging surrounding vehicle components if the replacement is performed without proper preparation and technique. Common damage scenarios include cracked headlight housings, melted wiring connectors, broken retaining clips, torn dust seals, and scratched reflector surfaces. This guide outlines the specific risks at each stage of an LED headlight replacement and provides practical steps to avoid them, helping vehicle owners, workshop technicians, and fleet maintenance teams complete the upgrade safely.
Preparing the Work Area and Gathering the Right Tools
Before beginning an LED headlight replacement, preparing the work area and having the correct tools on hand prevents many of the most common damage incidents. The vehicle should be parked on level ground with the engine off and the headlights switched off for at least 15 minutes to allow halogen bulbs to cool — touching a hot halogen bulb during removal can cause thermal shock and shatter the glass. Essential tools include: clean cotton or nitrile gloves (never touch LED chips or halogen glass with bare fingers), a trim panel removal tool set (for accessing headlight assemblies behind bumper covers), a magnetic pickup tool (for retrieving dropped screws in tight engine bays), dielectric grease (for protecting electrical connectors), and a digital multimeter for verifying power before and after installation. Avoid using metal pliers or screwdrivers to pry bulbs or connectors, as metal tools can crack plastic housings and short electrical contacts.
Removing the Old Bulb Without Damaging the Housing and Retaining Clips
The most frequent damage during LED headlight replacement occurs during removal of the existing halogen bulb. Most headlight assemblies use one of three retention methods: spring wire clips, bayonet-style twist locks, or plastic retaining rings. Spring wire clips are typically found on H4 and H7 sockets and require careful unlatching — forcing the clip outward can break the plastic tab it anchors to on the housing. The correct technique is to press the clip inward and then pivot it sideways to release it from the retaining notch. Bayonet twist locks (common on H1 and some H11 sockets) require a quarter-turn counterclockwise to release — if the bulb does not turn freely, applying penetrating oil to the base and waiting five minutes prevents the forceful twisting that cracks the housing collar. Plastic retaining rings should be unscrewed by hand rather than with pliers, as pliers can deform or crack the ring. When extracting the old bulb, pull straight outward without tilting — tilting can scratch the reflector coating inside the housing, creating permanent light scatter artifacts.
Protecting Wiring Connectors and Harnesses During Installation
LED headlight bulbs often come with additional wiring that halogen bulbs do not have: external driver boxes, Canbus decoder modules, and adapter cables. These additions can create routing challenges in engine bays not designed for them. To avoid damaging the vehicle's original wiring harness, follow these guidelines: never splice or cut the factory headlight wiring to accommodate LED components — use the plug-and-play connectors supplied with the LED bulb kit. Route all additional wiring along existing harness paths using zip ties, keeping wires away from hot surfaces such as exhaust manifolds and radiator hoses. Ensure the LED driver module is secured to a flat, metal surface using the provided mounting bracket or double-sided thermal tape — a loose driver module bouncing in the engine bay will eventually chafe through its insulation and short circuit. When connecting the LED bulb to the vehicle's factory connector, apply a thin film of dielectric grease to the contact pins to prevent corrosion and ensure a stable electrical connection. For vehicles with positive-switching headlight circuits, verify the LED bulb's polarity compatibility before connecting to avoid reverse-current damage to the LED driver.
Managing Heat Sink Clearance and Dust Cover Modifications
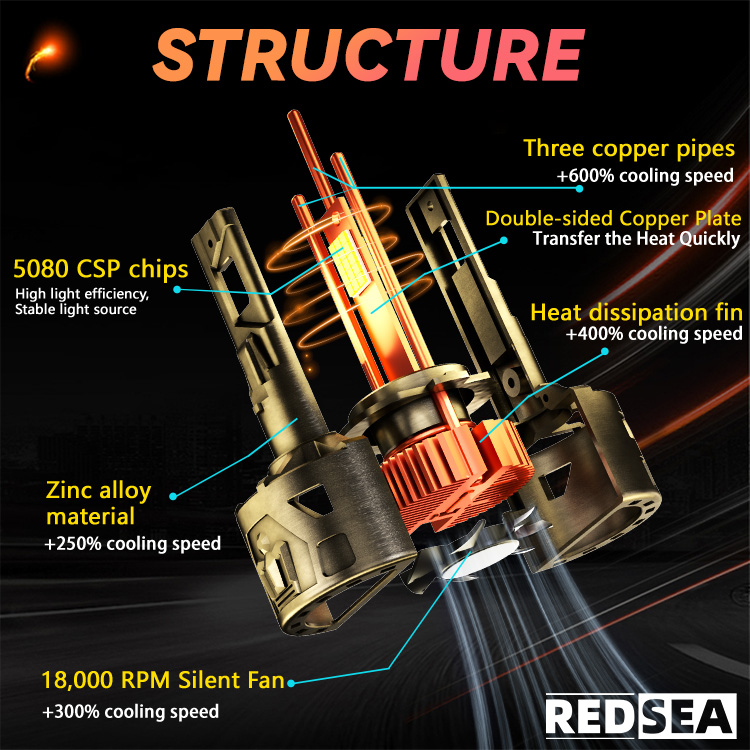
One of the most challenging aspects of an LED headlight replacement is accommodating the LED bulb's rear-mounted heat sink within the headlight housing's limited rear clearance. Passive heat sinks (copper braided straps or aluminum fins) and active heat sinks (miniature fans) extend 30 to 60 millimeters beyond the bulb base, and many factory dust covers cannot be reinstalled with this hardware in place. The common but risky solution is to drill or cut a hole in the dust cover to pass the heat sink through — this must be done carefully, as an oversized hole compromises the housing's moisture seal and allows dust and humidity to enter, which can fog the lens and corrode the reflector. The correct approach is to use the rubber grommet or silicone extension boot supplied with quality LED bulb kits, which creates a weatherproof seal around the heat sink penetration point. If no grommet is supplied, measure the heat sink diameter precisely and drill the dust cover to exactly that dimension, then seal any gap with automotive-grade silicone. Never run an LED bulb without a dust cover in place, as the housing's IP rating depends on a complete seal.
Verifying Beam Alignment and Function Before Closing Up
After the LED headlight replacement is physically complete, performing a function and alignment check before reassembling all trim pieces saves significant time if adjustments are needed. Turn on the low beam and verify both headlights illuminate evenly with no flickering. Switch to high beam and confirm the beam pattern shifts upward as expected — if the high beam does not activate, the H4 dual-beam wiring may be reversed. Check the dashboard for any bulb-out warning lights that would indicate a CAN bus compatibility issue requiring a Canbus decoder. Perform a beam alignment check against a wall at 7.6 meters: the horizontal cutoff line should be level and at or slightly below the headlight center height. If the beam pattern is scattered or the cutoff is absent, the LED bulb's chip position may not match the housing's reflector geometry — this is not a defect but a compatibility mismatch, and a different LED bulb model should be tried before reassembling. Only after all checks pass should trim panels, bumper covers, and radiator shrouds be reinstalled.
Case Study: Preventing Connector Melting in a Fleet Upgrade Program
A delivery service company replacing headlights across a fleet of 60 light commercial vehicles encountered a pattern of melted wiring connectors appearing three to four months after LED headlight replacement installations. Investigation revealed that the installations had been performed by multiple technicians using different LED bulb brands, and several installations involved forcing the LED bulb base into the H4 socket without verifying full seating of the electrical tab contacts. Partially seated contacts create high-resistance connections that generate heat under load, gradually degrading the plastic connector housing. The company implemented a standardized installation protocol: all LED headlight replacements were to use a single approved bulb model, technicians were required to verify full contact seating by feel and visual inspection, and dielectric grease was applied to all contacts during installation. After implementing this protocol, no further connector melting incidents occurred across the remaining 40 vehicle installations. For fleet operators sourcing LED bulbs, manufacturers such as Dongguan Red Sea Technology provide H4 LED bulbs with precision-machined bases that match factory halogen bulb tab dimensions, reducing the risk of partial contact seating that leads to connector damage.
Frequently Asked Questions
Q: Do I need to disconnect the battery before replacing headlight bulbs?
A: While not strictly necessary for halogen-to-LED swaps on older vehicles, disconnecting the negative battery terminal is recommended for vehicles with CAN bus electrical systems to prevent short circuits and ECU error codes during the replacement process.
Q: Can I reuse the original dust cover when installing LED headlight bulbs?
A: It depends on the LED bulb's heat sink design. If the heat sink fits within the housing's rear clearance, the original dust cover can be reused. If the heat sink extends beyond the cover, use the supplied rubber grommet or a silicone extension boot to maintain the housing's weather seal.
Q: Will installing LED headlights void my vehicle warranty?
A: In most cases, installing aftermarket LED headlight bulbs does not automatically void the entire vehicle warranty. However, if the installation causes damage to the headlight housing, wiring, or electrical system, repairs for those specific components may not be covered. Always use plug-and-play LED kits that do not require cutting factory wiring.
Table of Contents
- Why LED Headlight Replacement Requires More Care Than Halogen Swaps
- Preparing the Work Area and Gathering the Right Tools
- Removing the Old Bulb Without Damaging the Housing and Retaining Clips
- Protecting Wiring Connectors and Harnesses During Installation
- Managing Heat Sink Clearance and Dust Cover Modifications
- Verifying Beam Alignment and Function Before Closing Up
- Case Study: Preventing Connector Melting in a Fleet Upgrade Program
- Frequently Asked Questions
